
- udemy課程
- k8s集群搭建
- init.sh https://www.youtube.com/watch?v=j5rmtgyP8vY
- 檢查安裝結果
- kubeadm version
- kubelet --version
- kubectl version
- 安裝master節點
- 默認配置 kubeadm config print init-defaults > kubeadm-config.yaml
- 修改 主機ip advertiseAddress: 192.168.100.129
- 修改 flannel ip podSubnet: "10.244.0.0/16"
- kubeadm init --config=/usr/local/k8s/config/kubeadm-config.yaml
-- kubeadm init --apiserver-advertise-address=192.168.100.129 --pod-network-cidr=10.244.0.0/16 - kubeadm reset
- rm -rf $HOME/.kube
- 安裝 flannel
- https://kubernetes.io/docs/concepts/cluster-administration/addons/
- 檢查安裝結果
- kubectl get node
- kubectl get pod -A -o wide
- kubectl get pod -A -o wide -w
- 安裝後
- KubeConfig 設定檔 $HOME/.kube/config
- 分類
- clusters 集群
- users 用戶
- contexts 用戶X集群
- 常用指令
- 指令
- 種類
- imperative命令式
- declararive聲明式
- 進程
- ps -aux | grep kube-apiserver
- ps -aux | grep kube-controller-manager
- ps -aux | grep kube-scheduler
- ps -aux | grep kubelet
- pod
- kubectl run nginx --image nginx
- kubectl create -f pod.yml "命令式管理"(
Imperative Management) - 需先刪除再創建
- kubectl apply -f pod.yml "聲明式管理"(
Declarative Management) - 可以重複創建
- 不適用於更新「所有欄位」的資訊
- kubectl get pods
- kubectl describe pod {pod name}
- kubectl delete pod --all
- kubectl exec {pod name} -c {container name} -it -- /bin/sh
- kubectl get po {pod name} -o yaml > webapp.yaml
- kubectl replace -f
- It will remove the existing resource and will replace it with the new one from the given manifest file.
- replicaset
- deployment
- namespace
- 自訂kube-schedule
- kubectl get events -o wide
- monitor
- kubectl top node
- kubectl top pod
- kubectl logs -f {pod}
- ResourceQuota
- YAML
- in k8s 必要屬性
- apiVersion > v1
- kind > pod、service、replicaset、deployment、
- metadata > 對象的名稱、標籤
- spec > containers(數組)
- 建立 yaml template
Reference (Bookmark this page for exam. It will be very handy):
pod
Create an NGINX Pod
kubectl run nginx --image=nginxGenerate POD Manifest YAML file (-o yaml). Don't create it(--dry-run)
kubectl run nginx --image=nginx --dry-run=client -o yamldeployment
Create a deployment
kubectl create deployment --image=nginx nginxGenerate Deployment YAML file (-o yaml). Don't create it(--dry-run)
kubectl create deployment --image=nginx nginx --dry-run=client -o yamlGenerate Deployment with 4 Replicas
kubectl create deployment nginx --image=nginx --replicas=4You can also scale a deployment using the
kubectl scalecommand.kubectl scale deployment nginx --replicas=4Another way to do this is to save the YAML definition to a file and modify
kubectl create deployment nginx --image=nginx --dry-run=client -o yaml > nginx-deployment.yamlservice
Create a Service named redis-service of type ClusterIP to expose pod redis on port 6379
kubectl expose pod redis --port=6379 --name redis-service --dry-run=client -o yaml(This will automatically use the pod's labels as selectors)
Or
kubectl create service clusterip redis --tcp=6379:6379 --dry-run=client -o yaml(This will not use the pods labels as selectors, instead it will assume selectors as app=redis. You cannot pass in selectors as an option. So it does not work very well if your pod has a different label set. So generate the file and modify the selectors before creating the service)Create a Service named nginx of type NodePort to expose pod nginx's port 80 on port 30080 on the nodes:
kubectl expose pod nginx --type=NodePort --port=80 --name=nginx-service --dry-run=client -o yaml(This will automatically use the pod's labels as selectors, but you cannot specify the node port. You have to generate a definition file and then add the node port in manually before creating the service with the pod.)
Or
kubectl create service nodeport nginx --tcp=80:80 --node-port=30080 --dry-run=client -o yaml(This will not use the pods labels as selectors)
Both the above commands have their own challenges. While one of it cannot accept a selector the other cannot accept a node port. I would recommend going with the
kubectl exposecommand. If you need to specify a node port, generate a definition file using the same command and manually input the nodeport before creating the service.


- 集群結構
- master節點
- kube-apiserver : 與集群溝通入口
- etcd : 存放集群配置
- kube-controller-manager : 监视集群各組件狀態, 讓集群達到期望狀態
- kube-scheduler : 依據親和性、污點和容忍度 決定pod部屬的worker node
- kube-proxy : 集群間通信
- worker node節點
- kubelet : 接收apieserver的指令 , 安裝/卸載Pod
- kube-proxy : 集群間通信

- pod生命週期
- container 只為特定任務(task)與進程(process)執行後即退出
- initContainers: 啟動時只執行一次,在containers執行前
- containers: 真的執行的容器,可多個
- 監聽container是否存活
- replicaset & replicaset controller
- Liveness and Readiness Probes
- docker指令格式
- docker run [FLAG] ubuntu [COMMAND]
- dockerfile & docker命令
- "CMD" 命令在容器啟動時執行 , 例如 ubuntu是 "bash"
- shell格式 : CMD command param
- JSON格式 : CMD ["command", "param"]
- "ENTRYPOINT" 命令在容器啟動時執行 , 啟動時只需要param
- Dockerfile & YAML & docker命令
- env : 環境變數
- 三種配置方式 plain-key , configMap , secrets
- configmap配置方式
- secrets配置方式
- only base64 encode
- 加密 echo -n '明文' | base64
- 解密 echo -n '明文' | base64 --decode
- 使用 靜態加密 方可加密保存至etcd
- 線上課程
- step 1: 安裝etcdctl
- step 2: 檢查加密規則 ps -aux | grep api-server > --encryption-provider-config
- step 3: 創建資源 kind: EncryptionConfiguration , 選擇要加密的資源為secret
- step 4:修改api-server.yaml , 掛載EncryptionConfiguration
- step 5:等待api-server重啟
- step 6 : 創建secrets
- step 7: etcdctl檢查
- 任何能創建 pod的帳號都能訪問secrets
- RBAC創建角色權限
- 考慮用三方保存secrets
- sidecar
- 每個pod內內置一個logstash或filebeat收集log
- 共用卷
- ELK index教學


- 組件
- etcd
- key-value儲存集群信息
- nodes
- pods
- configs
- secretes
- accounts
- roles
- bindings
- replicasets
- deployments
- 下載安裝 默認端口: 2379
- 指令
- 啟用etcd ./etcd
- v2
- ./etcdctl --version
- ./etcdctl set key value
- v3
- export ETCDCTL_API=3
- ./etcdctl version
- ./etcdctl put key value
- 資料沒有加密
- kube-apiserver
- cat /etc/kubernetes/manifests/kube-apiserver.yaml
- 默認端口: 6443
- 透過kubectl指令、post請求、pod dashboard 與k8s集群溝通的入口
- 唯一與 etcd溝通的組件
- 所有的請求將會進行驗證 , 驗證所需資料儲存在etcd
- 例如apiserver收到新增pod請求 > kube-scheduler返回佈署的worker node位置 > 紀錄在etcd > 通知worker node上的kubelet > 建立pod > 返回結果給apiserver紀錄在etcd
- kube-controller-manager
- cat /etc/kubernetes/manifests/kube-controller-manager.yaml
- 监视集群各組件狀態、調整狀態 , 透過kube-apiserver完成
- node controller
- 心跳間隔5s , 失敗40s後視為無法訪問
- replication controller
- self-healing applications , 確保pod副本數
- replicaset
- self-healing applications , 確保pod副本數 , HA、LB
- apiVersion: apps/v1
- 多了selector
- other controller...
- kube-scheduler
- cat /etc/kubernetes/manifests/kube-scheduler.yaml
- 依據綁定、親和性、taint污點和tolerant容忍度、節點label標籤、節點affinity親和性 , 決定pod部屬的worker node
- pod.yaml 沒有指定 nodeName: , 則由kube-scheduler均衡佈署到所有worker node
- 節點taint污點和Pod tolerant容忍度
- 在node上打上汙點 , pod將排除worker node
- master節點本身帶有NoSchedule汙點
- taint污點 : 設置在worker node上 , 防止pod佈署
- tolerant容忍度 : 設置在pod上, 可以佈署到worker node上
- not tolerant汙點效應 : 當pod不能忍受汙點時的反應
- NoSchedule : pod無法佈署該worker node
- PreferNoSchedule : pod嘗試避免佈署該worker node
- NoExcute: pod無法佈署該worker node & 驅逐已佈署的pod
- 節點label標籤
- 在node上打上標籤 , pod以 nodeSelector指定
- 只能1對1
- 節點affinity親和性
- requiredDuringSchedulingIgnoredDuringExecution 強制
- preferredDuringSchedulingIgnoredDuringExecution 首選
- 自訂scheduler
- 下載二進制kube-schedule , 打包成docker image ,
- 在pod.yaml 的 spec.schedulerName: {名稱}
- kubelet
- 接收apieserver的指令 , 安裝/卸載Pod
- 與master註冊集群節點
- kube-proxy
- pod network , 集群間通信
- master node與worker node都有kube-proxy進程 , 以DaemonSet佈署
- 轉發流量到後端的pod上 , 一種方式是透過各節點上的iptables規則
- pod
- k8s的最小單位 , 同個pod內的container共享網路空間&存儲空間
- 通常1 pod只有1個應用程序 container , 除非是不同種類的應用程序
- resource : 每個pod都能設置資源大小
- 每container
- requests.memory : "1Gi" (默認512M)
- requests.cpu : 1 (默認1)
- limit.memory : "1Gi"
- limit.cpu : 1
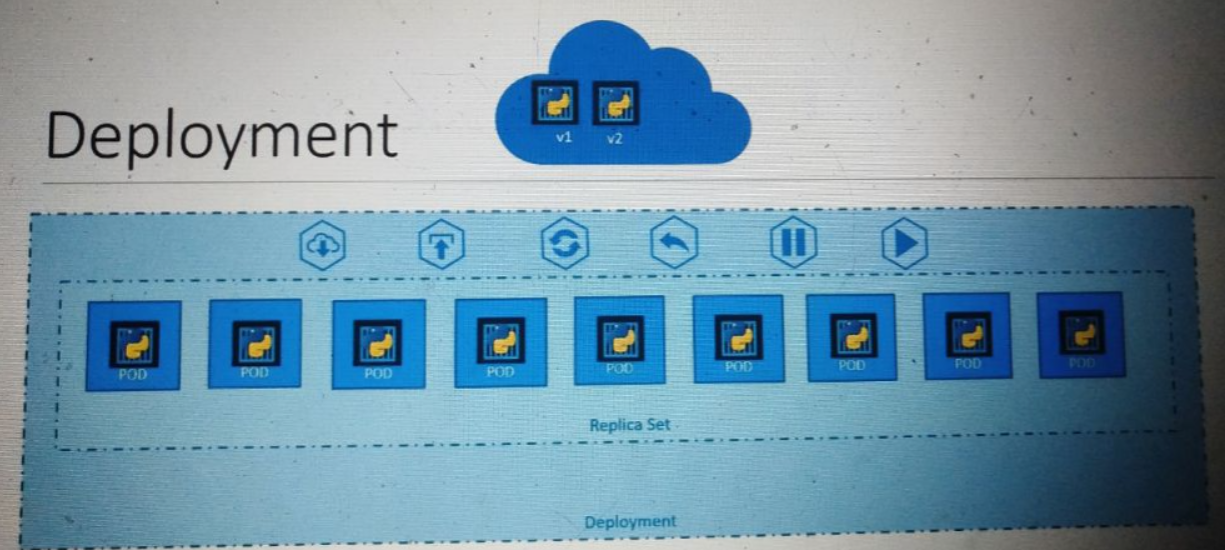
- replicaset
- 配置方式跟DaemonSet類似
- 一次部屬多個pod , 監控pod數量
- HA & LB
- selector label會指向pod的label
- deployment
- 能為服務做逐步升級
- depolyment strategy
- recreate : 全部下架,全部上架
- rolling update : 灰度發布(默認)
- service
- 訪問任一個workder node , 即可跨worker node集群 , 跨pod集群的任一pod
- selector label會指向pod的label
- 術語 :
- Tartget Port : pod上
- Port : service上
- NodePort : node上 30000~32767
- 類型
- NodePort : 供集群外部訪問 , 在node上開啟port號以進行訪問
- ClusterIp : 供集群內部訪問 , 例如前端服務與後端服務間的通信
- LoadBalance : 僅在支持的雲服務商提供附載均衡
- 可在用戶終端建立一個 Loadbalance服務, 將流量分散到workder node集群上
- namespace
- 隔離資源
- 在相同命名空間的服務, 可以直接使用hostname連線
- 跨不同命名空間的服務 , 需使用 {service name}.{namespace}.svc.cluster.local
- cluster.local : 默認域名
- 預留空間
- default
- kube-system
- kube-public : 所有用戶可以使用的資源
- DaemonSet
- 配置方式跟ReplicaSet類似
- 確保每一個worker node運行的pod
- 用途 : monitor、log
- example : kube-proxy
- k8s v1.12前的版本
- 使用node affinity & default schedule
- static pod
- 由kubelet自行創建的pod , kube-apiserver無法干預(因此只能到worker node上刪除)
- .../kubelet --pod-manisfet-path or .../kubelet --config (staticPodFile)
- example: master節點上的 kube-apiserver, kube-controller-manager..etc 都屬於static pod
- Binding
- 綁定pod佈署的worker node
- ResourceQuota
- 供不同命名空間 , 做限制資源用
- configmap
- 一般key&value
- secrete
- 種類1 : pod需與k8s api溝通所需的secrete
- 種類2 : 單純以base64加密的密碼
- 種類3 : 為了與私有鏡像庫身分認證
- vulume
- 為持有化資料 , pod內所有container共享存儲卷
- pause會與vulume進行掛載綁定 , container啟動後與pause建立連接


- 常見的卷種類
- emptyDir : 建立pod直至刪除, 該卷會一直存在
- hostPath : 將(node)工作節點的目錄掛載至pod中
- 可利用其在本機獲取container內部文件

- 集群維護
- worker node損壞 or OS升級
- 心跳默認5分鐘(eviction-timeout) , 超過則將replicaset pod佈署到其他worker node
- 步驟
- step 1 : 清空該節點所有佈署,標記為不可佈署
- kubectl drain {node} (如果非replicaset pod會失敗)
- step 2 : 重新啟動worker node
- step 3 : 加入節點 , pod加入
- kubectl uncondon {node}
- kubectl condon {node} : 不會加入新pod
- 當K8S升級
- 管理軟件版本
- k8s外的服務如etcd , 有其對應的版本號
- 版本規則 ( kube-apiserver 版本需最高 )
- 如果使用kubeadm安裝
- kubeadm upgrade plan
- kubeadm upgrade apply
- 步驟
- kubectl get node 將獲取各節點版本號
- step 1 : 升級master node()
- 升級 kubeadm命令
- kubeadm upgrade apply
- kubectl drain {node}
- 升級 kubelet命令&kubectl命令
- restart kubelet
- kubectl uncondon {node}
- step 2 : 逐台升級worker node
- kubectl drain {node}
- 升級 kubeadm命令
- 升級 kubelet配置 kubeadm upgrade node config --kubelet-version v.12.0
- 升級 kubelet命令&kubectl命令
- restart kubelet
- kubectl uncondon {node}
- 備份與還原
- 多個k8s集群
- kubectl config get-clusters
- kubectl config use-context {cluster}
- etcd
- ETCDCTL_API=3 etcdctl \
--endpoints=https://127.0.0.1:2379 \
--cacert=/etc/etcd/pki/ca.pem \
--cert=/etc/etcd/pki/etcd.pem \
--key=/etc/etcd/pki/etcd-key.pem \
member list - 備份種類
- yaml
- kubectl get all --all-namespace -o yaml > backup.yml
- etcd
- backup步驟
- ETCDCTL_API=3 etcdctl --endpoints=https://127.0.0.1:2379 \
--cacert=/etc/kubernetes/pki/etcd/ca.crt --cert=/etc/kubernetes/pki/etcd/server.crt --key=/etc/kubernetes/pki/etcd/server.key \
snapshot save /opt/snapshot-pre-boot.db - restore步驟
- step 1 : stop api-server
- step 2 : backup restore
- step 3 : start api-server
- ETCDCTL_API=3 etcdctl --data-dir /var/lib/etcd-from-backup \
snapshot restore /opt/snapshot-pre-boot.db - 查看etcd是否重啟(wait 1-2min) watch "crictl ps | grep etcd"
- 清除etcd(wait 1-2min) kubectl delete pod -n kube-system etcd-controlplane
- export ETCDCTL_API=3
For example, if you want to take a snapshot of etcd, use:
etcdctl snapshot save -hand keep a note of the mandatory global options.Since our ETCD database is TLS-Enabled, the following options are mandatory:
--cacertverify certificates of TLS-enabled secure servers using this CA bundle--certidentify secure client using this TLS certificate file--endpoints=[127.0.0.1:2379]This is the default as ETCD is running on master node and exposed on localhost 2379.--keyidentify secure client using this TLS key fileSimilarly use the help option for snapshot restore to see all available options for restoring the backup.
etcdctl snapshot restore -h - 安全
- 驗證權限
- 身份驗證
- username and password
- username and token
- certificates
- ldap
- 授權驗證
- Node 節點授權
- ABAC 屬性授權
- RBAC (Role Based Access Controls)
- WebHook
- AlwaysAllow
- AlwaysDeny
- 身份憑證 Certificate
- 架構
- 產生&配置憑證
- K8S⾃我簽署的Root CA憑證
- 產生user client憑證
- 產生other client憑證
- 產生api server憑證
- 產生etcd server憑證
- 產生kubetlet server憑證
- 查看crt證書詳情 & 官方推薦
# kubectl get csr {name} -o yaml
# openssl x509 -name {pwd} -text -noout - 對照表
- 身份憑證簽署Certifacate
- k8s master node扮演RCA Server的角色 , 可透過 Certifacate API 自動化完成憑證簽屬 ( Controller Manager )
- 簽署流程
- 客戶端生成CSR
- 簽署CSR
- 拒絕簽署
- kubectl certificate deny {name}
- 獲取CRT
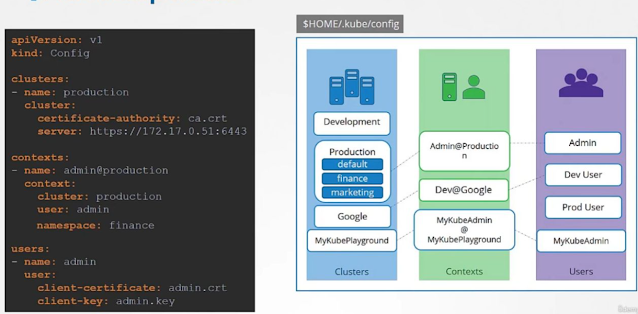
- KubeConfig配置集群访问
- 默认情况下,
kubectl在$HOME/.kube目录下查找名为config的文件。 你可以通过设置KUBECONFIG环境变量或者设置--kubeconfig参数来指定其他 kubeconfig 文件 - 配置三者關係 clusters、contexts、users
- clusters : 集群 , ca.crt , server http地址
- contexts : cluster&users關聯 , 命名空間
- users : 用戶 , user.crt , user.key
- 配置方式 file(kind: Config)
- 配置位置 $HOME/.kube/config
- 修改配置立即生效
- kubectl config view 輸出多個配置合併的結果
- kubectl config use-context {name}
- 身份憑證 API GROUP
- 本地端 'kubectl proxy'可以透過啟動proxy , 自動附上憑證Certifacate
- proxy port 8001 > curl 8001
- 分類
- core api
- named api
- 授權驗證
- 帳戶類型
- 用戶帳戶 (user account)
- 服務帳戶 (service account)
- 授權類型
- Node 節點授權
- 例如各節點上的 kubelet (system:node)
- ABAC
- 例如用戶或用戶群組直接給予授權
- Kind : Policy
- 需要重啟apiservice , 難以管理
- RBAC
- 例如用戶與角色關聯
- 定義角色授權
- WebHook
- 例如由外部管理授權 , 而不是內治機制
- 調用外部取得授權與否
- RBAC授權驗證
- Role
- 根據 namespaces創建
- 綁定流程
- 建立 kind: Role
- apiGroups:
- resources:
- resourceNames:
- verbs:
- 建立 kind: RoleBinding
- check access self
- kubectl auth can-i {create deployment} --as {user} --namespace {name}
- ClusterRole
- 根據cluster創建
- 綁定流程同Role
- 服務帳戶 (service account)

- 例如
- prometheus > k8s api
- jenkins > k8s api
- 默認service account
- 每個namespaces都有一個
- 自動掛載在pod
- 僅有查詢權限
- 可在 pod.yaml 關閉
- 自定義service account
- 建立service account後 , 在pod下定義 serviceAccountName
- 當有pod運行時, 無法修改service account , 但是deployment可修改service account
- 建立tolen
- kubectl create token {name}
- k8s < v1.22
- 建立第三方服務帳戶時k8s自動生成token & secrets > 身分驗證
- 如果第三方服務在k8s內部, 則可以用volume取得token
- k8s v1.22
- token增加了 time-bound, audience-bound, and object-bound
- 限制有效時間 、限制訪問服務、限制訪問資源
- k8s v1.24

- 建立service account時不自動生成token & secrets
- 解析token
jq -R 'split(".") | select(length>0) | .[0],.[1] | @base64d | fromjson' <<< {token} - 不過期的token


- 映像檔策略
- image
- {registry} 默認 docker.io
- {user account} 默認 library
- isolation
- docker內默認使用root帳號執行 , 但限制了root的權限
- linux功能列表 /usr/include/linux/capability.h
- 改變執行帳號
- Dockerfile
- docker run --user=xxxx
- 改變Linux功能
- docker run --cap-add XXXX
- 網路策略
- A服務視角
- ingress 進入的流量
- engress 出去的流量
- 默認"all-allow"策略 , 所有pod間網路相通
- by service name
- by pod name
- by ip
- 自訂網路策略
- kind: NetworkPolicy
- podSelector 使用label選擇pod
- policyTypes ingress或engress
- ingress 與 engress 默認都是開通
- ingress
- engress
- 三種策略
- podSelector
- namespaceSelector
- ipBlock


沒有留言:
張貼留言